

How to Draw A Banner. We can use banners for many different purposes and occasions. These can range from birthday parties and weddings to carnivals and renaissance celebrations.
Also, check our Cat Coloring Pages.
They can come in shapes, sizes, materials, and colour combinations, and there can be a banner for every occasion.
Drawing a banner can be challenging, but this is your guide if you want to know how.
At the end of this guide, you will also see that not only can it be easy, but it can also be a lot of fun!
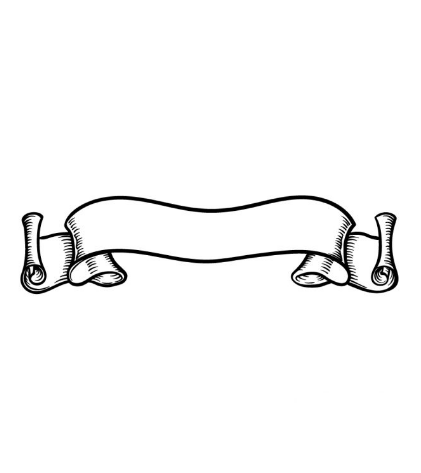
How to Draw A Banner
Step 1
To begin this guide to drawing a banner, let’s start with the central “body” of the banner.
This should be one of the easiest parts of this drawing, as you only need to draw some wavy lines.
They will bend down slightly on both ends as they go into the folds of the banner we will draw in the next few steps. Once these lines are drawn, you can move on to the next step!
Step 2
After you’ve designed the body of your banner, you’re ready to begin the folds on the sides for this part of your banner design.
First, let’s add some slightly curved vertical lines to the sides of the banner. These curve inward, turning the body of the banner into a solid shape.
After drawing these lines, let’s add some rounded shapes below the ends of the banner.
These can be drawn with curved, rounded lines, making it appear as if the banner unfolds at both ends.
Do your best to replicate these shapes as they appear in the reference image, and then we’ll move on to step 3 of the guide.
Step 3
In this part of our guide on drawing a banner, we will continue to draw the unfolding effect. For now, we’ll focus on the left side, and you can start by drawing two wavy lines out of that side’s vertical edge.
These then extend into more inverted vertical lines, and at the bottom, you can draw a winding spiral line to indicate where the banner is still wrapped. This makes it look like this banner is made of parchment or paper.
If any of this seems confusing, follow the reference image along with this step to ensure you don’t get lost!
Step 4
In step 4 of your banner design, you mirror exactly what you did in the previous step.
Using the same curved lines, you can draw the unfolding banner the same way you did before, and then you can finish it off with another spiral line at the bottom of the shape.
With this side of the banner drawn, the next step is to add a few final details before we start colouring.
Step 5
You’ve completed the main outline of your image, so in this step of our how-to-draw banner guide, we will complete the last few details.
We’re going to add some shading lines to most of the lines in the banner, and these can be drawn with lots of small, thin lines in the areas you see in our reference image.
These give the banner more structure and depth. With those shading details done, you’re ready for the final step!
Step 6
You don’t have to proceed just yet, though. You can still add your own if you’ve completed our details.
As mentioned above, banners can come in various shapes and styles, so feel free to change the look and detail if you have a different design in mind!
This would be a great design to incorporate into a Birthday or Christmas card, and you could also write a name or message on the banner.
Step 7
In this last step of your banner design, you can complete it with great colours!
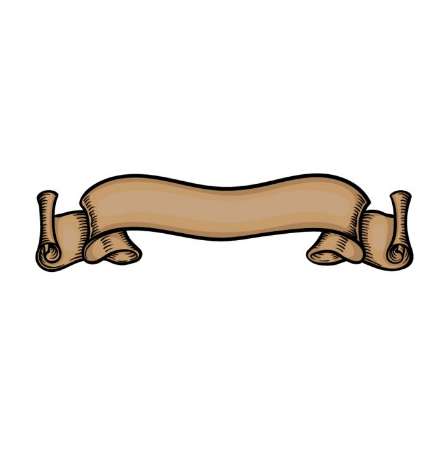
We used some shades of brown for our sample image as this helps give the banner the look of aged parchment.
By the way, there are so many colours you could choose too! You could use a similar pattern or go bright and bold with your colourful pencils or paints.
This step is entirely up to you and your creativity, and we can’t wait to see you finish this drawing!
Your Banner Drawing is Finished!
Table of Contents